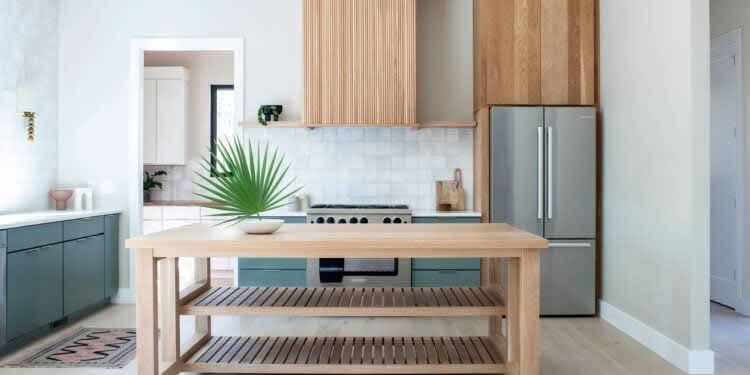
Did you love the plant stand from the latest cover of NEST Magazine ?

Ready to make your own? Follow along with Graeme’s cut list and instructions! ( Click here for a printable PDF )
SUPPLIES
- (8) 1” x 3” x 8’ pine boards (actual 3⁄4” x 2 1⁄2 ” x 8’)
- (2) 1” x 12” x 8’ pine boards (actual 3⁄4” x 11 1⁄4” x 8’)
- Wood glue
- 2” finishing nails
- Wood filler
- Water-based wood pre-stain conditioner
- Wood stain in Early American
- 3” paint brush
- Clean rags
- Nitrile gloves
TOOLS
- Miter saw
- Cordless brad nailer
CUT
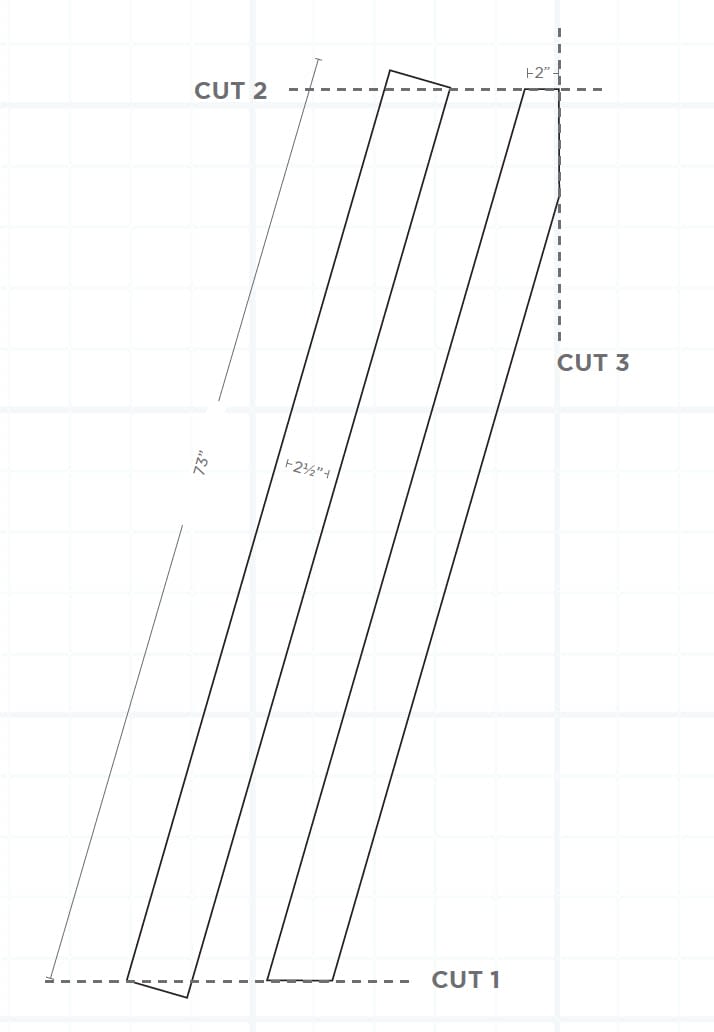
STEP 1 – CUT 4 long boards
CUT all four 1” x 3” boards to 73” length, repeat 3 times for 4 boards total
- CUT #1 – cut the bottom of each board at a 15 ̊ angle
- CUT #2 – cut the top of each board at a 15 ̊angle, parallel to the bottom cut
- CUT #3 – beginning 2” from the edge, cut the inside edge at the top of each board at a 15 ̊ angle in the opposite direction
STEP 2 – CUT 9 support boards
- Cut 1” x 3” boards to 11 1⁄2” length, repeat 8 times for 9 boards total
STEP 3 – CUT 4 shelves
- Cut 1” x 12” boards to lengths: 19”, 26”, 33”, 40”
ASSEMBLE
STEP 4 – Assemble frame
- Place the cut edges of 2 of the long boards together to create an “A” shape
- Using the brad nailer, nail through the face of the long board into the top support board, as shown below
- Repeat with remaining 2 long boards, nailing them into the opposite side of the top support board
STEP 5 – Attach supports
- Using a level to ensure that the supports are perfectly upright, attach the first pair of support boards between the “A” frames, with the top edge 11” from the ground
- Repeat at 24”, 37” and 50”
STEP 6 – Install shelves
- Set each of the shelves onto the supports, with the longest shelf on the bottom
- Leave shelves unattached so the entire unit is easy to move as desired
STEP 7 – Condition
- Wearing gloves and using a brush, apply pre-stain conditioner to all wood surfaces
- Allow to sit 5 minutes, then wipe off excess with clean, dry cloth
- Wash brush with soap and water
STEP 8 – Fill in holes
- Using wood filler, fill in each of the holes created by the finishing nails
STEP 9 – Stain
- Using the brush, liberally apply one coat of stain, then immediately wipe off excess with clean rag
- Allow to dry 2-3 hours, then apply a second coat of stain
STEP 10 – Add plants!
- Step back and enjoy your amazing work!
Nest Realty Wilmington Broker Matt Orr made two of these plant stands!! Check out Part 1 here:
View this post on InstagramDIY Project in the works! Day
@matt.orr_nest.realty is better than Bob Vila! stay tune for day
!
A post shared by Nest Realty Wilmington (@nest_realty_ilm) on May 7, 2020 at 1:58pm PDT


And Part 2 here:
View this post on InstagramA post shared by Nest Realty Wilmington (@nest_realty_ilm) on May 8, 2020 at 8:20am PDT
Heck yes!!! Give it a try and let us know how it goes! Use the hashtag #SOnesty to show us your creation!
We shared this story with you in our Spring/Summer 2020 Issue of NEST Magazine . To view the full issue, click here .
Spread the loveWritten by Jasmine Bible on May 27, 2020 Posted in Asheville , Charlottesville , Fredericksburg , Greater Louisville and Southern Indiana , Greensboro , Jackson , Lake Norman , NEST Magazine , New River Valley , Raleigh-Durham , Richmond , Roanoke , Shenandoah Valley , Spring/Summer 2020 , Wilmington Tags: #diy , a-frame plant stand , DIY Plant Stand , diy tutorial , gardening , gardening stand , indoor plants , plant stand , plants , summer bucket list Comments closed